A loopback device enables you to simulate a block device using an ordinary disk file.Data can be written or read from a file name disk-image rather than to and from the tracks and sector of an actual physical disk drive or disk partition.(ofcourcd disk-image must reside on an actual disk,which must be larger than the simulated disk). Loopback devices are named like /dev/loop0, /dev/loop1, and so on.Each can be used as a single block device at one time. Be sure when you are stting up loopback device you should be logged as a super user.
This loopback device can be used as any other block device(like your hard disk). You can create file system and mount this files system as you would mount the file system on a normal disk or partition.Such type of file system is basically called virtual file system.
Construct the virtual File System and Mount it with loopback device(Follow this step)
1.Create any 10MB file using dd command to hold the virtual file system. You can create this file anywhere as you like but i like to create in /tmp.
[suman@linux tmp]#dd if=/dev/zero of=/tmp/disk-image count=20480
your output should be like
20480+0 records in
20480+0 records out
10485760 bytes (10 MB) copied, 0.218746 seconds, 47.9 MB/s
2.cheack with ls -l command
[suman@linux tmp]# ls -l /tmp/disk-image
-rw-rw-r-- 1 suman suman 10485760 Jun 22 15:43 /tmp/disk-image
3.Now create a file System (i prefered ext2 File System..U can choose as you like) by this command
suman@ajit program]$ mke2fs -q /tmp/disk-image
It will ask for proceed just put y
/tmp/disk-image is not a block special device.
Proceed anyway? (y,n) y
4.Mount the file system using loopback device. Before that you need to create one mount point for the virtual file system.
[suman@linux tmp]# mkdir /tmp/virtual_fs
[suman@linux tmp]# mount -o loop=/dev/loop0 /tmp/disk-image /tmp/virtual_fs
5.If you don't see any error, you have successfully mounted the file System . Now cheack it through this command
[suman@linux tmp]#df -h /tmp/virtual_fs
you would see
Filesystem Size Used Avail Use% Mounted on
/tmp/disk-image 9.7M 92K 9.1M 1% /tmp/virtual_fs
6. Create one test file to test whether it is working correctly or not
[suman@linux tmp]# cd /tmp/virtual_fs
[suman@linux tmp]#echo 'I have done' >test.txt
[suman@linux tmp]#ls -l
lost+found test.txt
[suman@linux tmp]#cat test.txt
I have done
......lost+found is a direcxtory that was automatically added by mke2fs.
If want to unmount the file system just put this command
[suman@linux tmp]# umount virtual_fs
Why should i need loopback device? This question may arriase..let me tell one situation and explain me how we can use loopback device..
You have one CDROM image and you are using frequently. You need to just copy the whole CDROM image into new loopback device...you can do like that
[suman@linux]$ cp /dev/cdrom /tmp/disk-image
or
[suman@linux]$dd if=/dev/cdrom of=/tmp/disk-image
This may take several time depends on the size of your CD ROM. The resulting image file could be as large as the contents of the CDROM.
Now you can mount the CDROM image with out having the original CDROM in your CDROM.For example
[suman@linux]# mount -o loop=/dev/loop0 /tmp/disk-image /mnt/cdrom
You can access much faster than CDROM beacause whole CDROM content is in Hard Disk. Note most CDROM use the file System type iso9660.
You are playing a game which always needs your CDROM. You could not play without CDROM and sometimes you are seeing that your game is going to slow as you expected. Well create a loopback device and copy the CROM contents and mount it......and Enjoy...You are not accessing CDROM phisically which could save your CDROM life.
If you have any comments any question and also if you found any error about this mini tutorial please mail me and please leave your suggestion in comment section that i can improve later. I always apologies my poor english expression. forgive me..
Thursday, June 22, 2006
Wednesday, June 21, 2006
Tuesday, June 20, 2006
Linux kernel Develoment
Now a days i am little bit busy. I am learning how to write device driver under linux(maily char and USB). i have spend lots of time to search good meterial (for beginner) from internet.I started with LKMPG 2.6.x from tldp.org. Next I should read LDD3 by rubini(reading..)I listed some online metirial which i found during my study. Hope you could save some time to finding these metirial. I have given all the downloadable link. You just have to click the link and save it. Second tutorial is a link for entire book. You could get chapterwise pdf file from this site.
Tutorial No. 1
The Linux Kernel Module Programming Guide
Tutorial No. 2
Linux Device Driver by Jonathan Corbet, Alessandro Rubini, and Greg Kroah-Hartman(2.6.x kernel) Tutorial No.3
Writing Character Device Driver for Linux
Tutorial No. 4
Programming Guide for Linux USB Device Drivers
Those who are realy interested in kernel development and device driver here is great resource list.
Kernel Resource List
Happy Hacking!
Sunday, June 18, 2006
Running FreeBSD inside Fedora Core 5: QEMU A processor Emulator
Processor emulator is one kind of software which will allow one operating system to run in another operating system.We don't need to reboot the system and write boot sector in MBR.
It is very much usefull for testing cross platform application. Say you want to build one application which should run GNU/Linux,Micro$oft,FreeBSD and MAC OS. Then probabily you would need four different system or one system with four operating System.But every timr you have to reboot your system and test your application. Virtualization(i.e Processor Emulator) will help you to run four operating system in one platform. Just you have to switch one OS to onather by clicking your mouse.
There are many such type of application,both are open source and propitary. Here I have given some list , If you know another please update it.
Open Source:Xen,Bochs,QEMU,PeerPC etc
Propitary:Vmware,Micro$oft Virual PC etc
I have successfully installed freeBSD under my Fedora core 5 through QEMU.(Just for showing how it works) Here i am writing very small HOW-TO for Fedora code 5.
(As it is small , I am going to install from RPM not from source)
Step 1: First Get RPM fro FC5(Link)
Step 2: go to root by typing su - and your password
[suman@ajit ~]$ su -
Password:
Step 3: Install RPM
[suman@ajit qemu]# rpm -ivh qemu-0.8.1-1.fc5.i386.rpm
Step 4:put this command
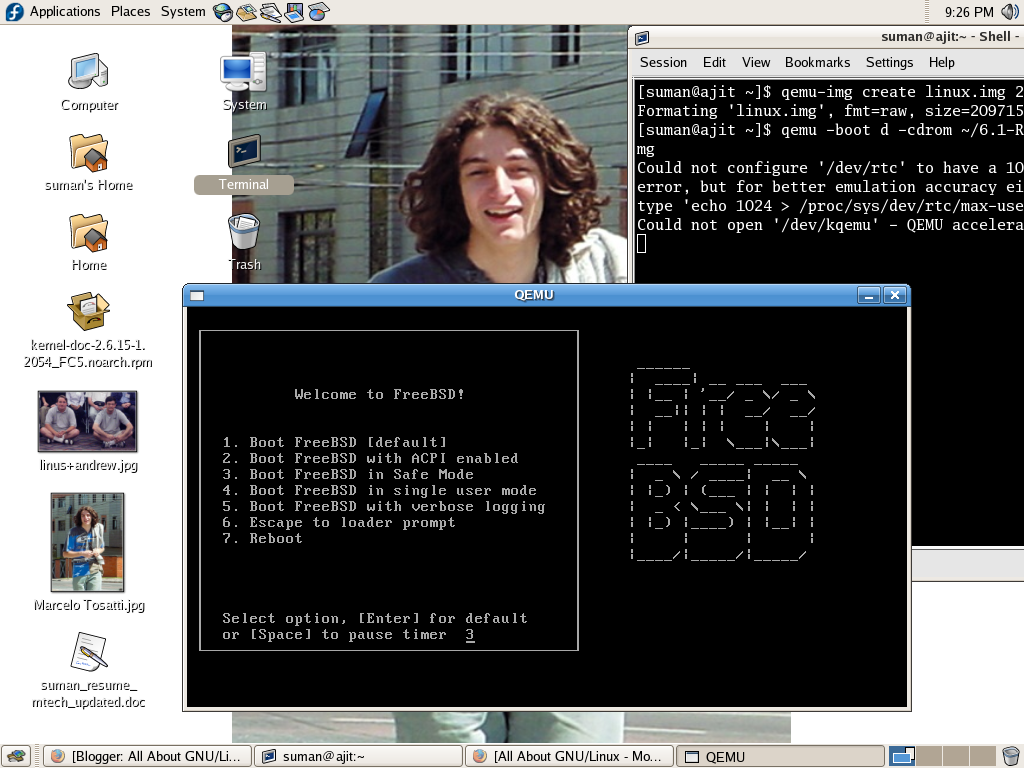
[suman@ajit ~]$ qemu-img create linux.img 2G
after successfull creation of linux.img file it should shows this message
"Formating 'linux.img', fmt=raw, size=2097152 kB"
Step 5: If you download iso image into your home directory then give this command
[suman@ajit ~]$ qemu -boot d -cdrom ~/6.1-RELEASE-i386-bootonly.iso -hda linux.img
Or
If you have CDROM then give this command
[suman@ajit ~]$ qemu -boot d -cdrom /dev/cdrom -hda linux.img
Congratulation! You will see that a freeBSD is booting from a separate window from your present Operating System..
Step 6:Relax and enjoy multiple Operating System from your system...
In this tutorial I didn't include any comment regarding any command. It is your task to read and understand .I am hereby giving some link from internet which will help you to understand..best of Luck!!
link1
Link2
Let me know if you have any comments regarding this mini tutorial..
Subscribe to:
Comments (Atom)